One of the biggest challenges in 2021 has been the IOS14.5 update on Facebook Ads. It killed attribution overnight, and stats just don’t show up inside Facebook Ads Manager like they used to.
This is not likely to return anytime soon due to new laws and policies by Apple, the European Union, California Privacy Act and many others coming to a city near you.
Android is also looking to implement these strict restrictions that will further kill 3rd party cookies and tracking.
But, there is a solution that allows you to track everything using 1st party cookies. It works using server to server postbacks instead of relying on 3rd party cookies placed on the users end.
How this works is explained really well over here or you can watch the video below that shows you step by step how to setup Facebook Conversion Tracking with cAPI and RedTrack Attribution & Tracking Tool
In this guide, I am going to show you how you can get back your Facebook ads reports and data in a manner of minutes just by using this amazing reporting tracking tool named RedTrack.
Redtrack allows you to try their tracking tool for FREE with their 14 days trial (no CC needed) so you can try it and see for yourself how good it actually is.
Once you have your account, what you need to do is to follow the steps I’m going to show you to get back your Facebook ads reports and data.
Here we go guys!!
[toc]
STEP #1 – Add Your Offer Source and Set Up the Postback
The first thing you need to do is to add your offer source (Affiliate Network) and set up S2S postback on the Affiliate Network side, so add your Redtrack postback URL to the Affiliate network.
In Redtrack click on Tools and select Conversion tracking.
Then copy your S2S Postback URL
Next go to your Affiliate Network, find the ’’postback’’ or ’’conversion tracking’’ settings and add your Redtrack postback URL there.

Don’t forget to replace the ’’[replace_me]’’ parts in the postback URL with the Affiliate Network’s correct parameter!

STEP #2 – Adding the Traffic Source (Facebook) and integrating API
In this step you need to add Facebook as your traffic source and set up API integration.
So in Redtrack click on Traffic Sources and +New

Then scroll down until you find Facebook and click on the Add button.

After that you need to connect your Facebook account via API.
Click on Connect and follow the steps to verify your account.

Once you have successfully connected your Facebook Account you will be redirected to your RedTrack account, and then you need to add your Conversion API key and Facebook Pixel ID.
Go to your Facebook account to generate the Conversion API key, go to Pixel settings, click on settings, scroll down until you see Conversion API, and click on Create access Token.

Once you generated your Token, copy to clipboard

go back to RedTrack integration settings, paste your API key.

Then you need to add your Pixel ID as well, so go back to your Facebook pixel setting and copy your Pixel ID

and add it to your RedTrack account

Join RedTrack Now!!! >>>
STEP #3 – Adding Your Offer
Next you need to add your unique offer link and make sure it includes the correct ClickID parameter.
To add your offer, click on Offers and + New
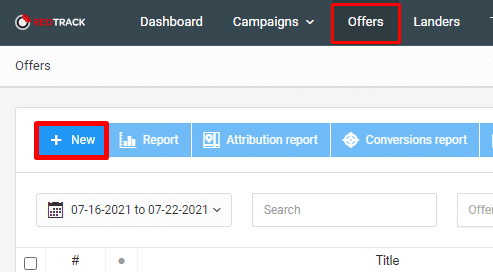
Then name your offer, select the Offer source (Affiliate network) and add your offer link in the URL box, make sure it contains the correct ClickID.
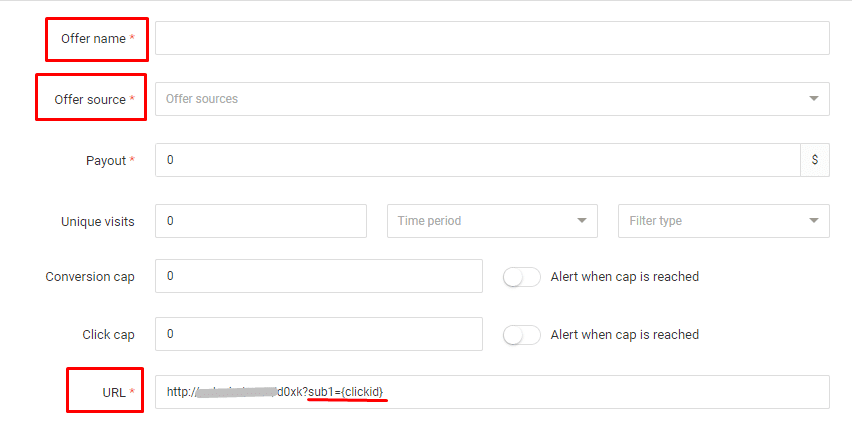
In my case I need to sent the clickid to the affiliate network on the sub1 macro, so I need to add the following to my offer URL:
?sub1={clickid}
If you aren’t sure what the correct value is, ask your CPA network rep for help, and they will be happy to assist you.
Step #4 – Verify and add your domain to the Offer section in Redtrack
Next you need to verify the domain you are using on Facebook and then add it to your offer in Redtrack.
First go to your Business Manager account to verify your domain, and select Domains from the Brand Safety menu.
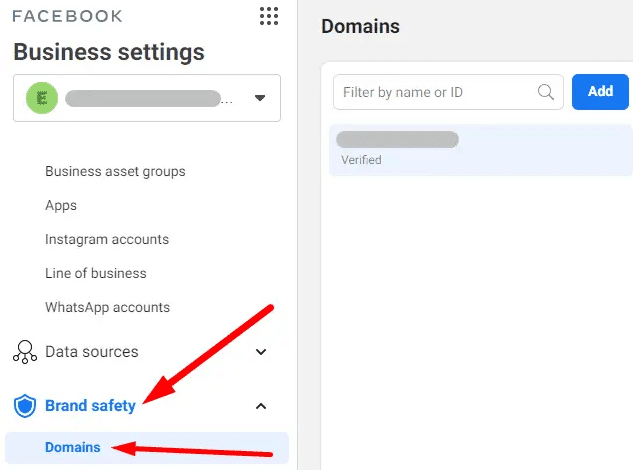
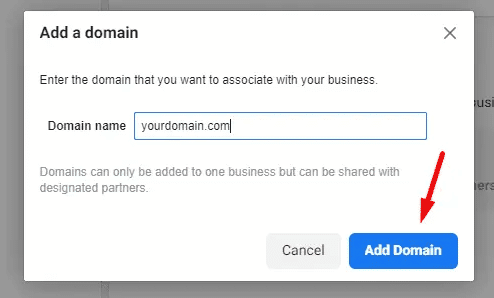
Then click on Add, put in your Domain name and click on Add Domain.
Next you need to configure DNS.
Select your domain on Facebook and click on DNS verification. Copy the Unique TXT and then go to the registrar where your domain is registered.
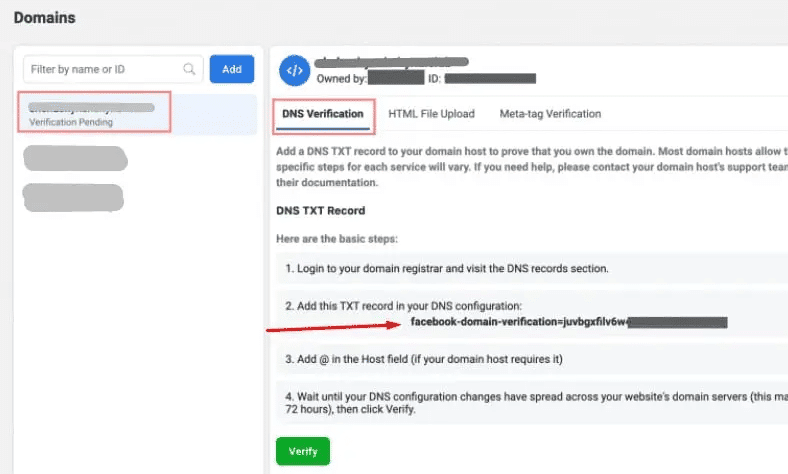
Open DNS settings at your domain registrar and add a new DNS record with the following values:
Host: @
Points to: your unique TXT record from point 4
TTL: the lowest possible

After that you can go back to Facebook and verify DNS by clicking on the green Verify button. The verification process can take up to 72 hours (but usually it’s much much less).
If the verification was successful, a green dot will appear next to your domain name on Facebook:

When all this is done, you need to go back to Redtrack, go to your Offer settings and you need to add your domain in the Default Event URL box.

Step #5 – Creating a Campaign in Redtrack
To set up a Redtrack campaign click on Campaigns and +New

Next you need to type in a name for your campaign, select a Traffic Source (Facebook) and your tracking domain (if you don’t use a custom tracking domain, leave it on default)

Then create your flow by choosing your Landing Page and Offer and click save.

After you click save your Click URL should appear.

However we are not going to use this Click URL because we want to create a NO-REDIRECT campaign for Facebook.
So in the campaign options section right above the Click URL select No-Redirect, and it will generate your no-redirect script that you need to add in your landing page header.

So edit the source code of your landing page with a code editor software like Sublime Text, and add the script into the <head> section of your lander.

That’s it, now you can simply use your LANDING PAGE URL as your final URL instead of Red Track campaign URL, and when someone clicks on any of the CTAs on your lander they will be sent to your offer.
Join RedTrack Now!!! >>>
Step #6 – Warming up your Facebook Pixel
You need to warm up your Facebook Pixel, because Facebook will not accept your event until it considers that it’s a real event that can be used for optimization on Facebook’s side. So you need some real clicks.
Create a campaign on Facebook with a low budget, all you need is to generate 10-20 clicks with RedTrack integration.
Before you launch your campaign, you need to make sure everything is set up correctly, and you will need to warm up your account with some fake conversions.
Step #7 – Generate fake conversions
You also need to generate some fake conversions after you received 10-20 clicks from the low budget warmup campaign you launched.
When you have the clicks, go to Redtrack, select Logs then Clicks and then you will see all the Click IDs you received clicks from.


Next copy the click id from the list and add it to your postback URL template. Go to tools, select conversion tracking and find S2S conversion tracking.

So copy the postback URL and add the click id to it. It will look something like this:
https://secure.yourdomain.com/postback?clickid=45632628119224825
Paste that link to your browser and press enter.

If you see the message above, it means you have successfully created a fake conversion. However just one conversion is not enough for warmup, so what you need to do is to repeat this step with other clickIDs you got in the logs, and generate about 10-15 conversions evenly within the day.
Step #8 – Check Data On Facebook
Once you have generated these fake warmup conversions check data on Facebook to ensure Facebook has received them successfully.
So go to your Business Manager, select Data Sources and Pixels.

Then you will see your events below.

Then go to the Aggregated events manager to configure your events

Choose your domain and you can start managing your events.
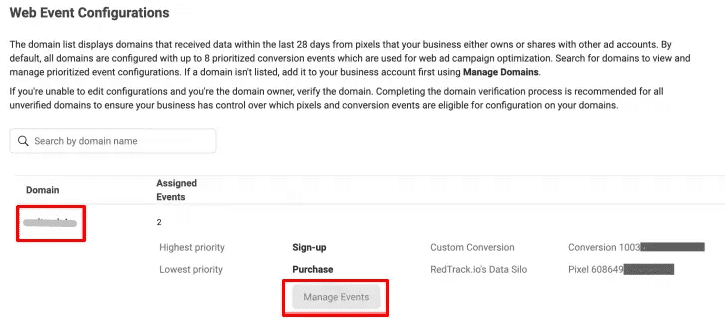
And that’s pretty much it guys, if you followed all the steps now you are ready to start running ads and track everything just like before the IOS 14.5 update nightmare, thanks to this amazing Tracking Tool RedTrack.
Join RedTrack Now!!! >>>
If you want to build your API based offers using Redtrack, you should check this post.


2 thoughts on “Forget HYROS, Here’s Ad Tracking Solution for Facebook Ads (cAPI) That’s Free To Try”
hey, doesnt voluum and binom have the same feature now too?
not sure, i use redtrack because it was the most affordable solution when voluum jacked up their prices years ago