In this guide I’m going to teach you how to prepare, launch and optimise successful campaigns, promoting LeadBit offers on MGID.
LeadBit is one of the most popular and one of the best CPA Networks out there. They are specialized in Nutra, Dating and Gambling offers. They have many other verticals too, but these are the most profitable ones these days.
Sign Up now and send your manager a promo code “iamattila25” to get extra $25 on your account.
In addition, run any LeadBit offers and earn $2K within the first month and get additional $200 on top of that.
When it comes to choosing a vertical to promote, I have very good experience with their Nutra offers, they are working with the world’s top Nutra manufacturers, so they offer you the best payout offers with the highest approval rates and great caps to scale.
Because of that, we are going to focus on Nutra offers in this guide, more specifically, how to prepare, run and optimise Nutra campaigns on MGID.
Here we go!
[toc]
Choosing Offers to Promote
Okay so as I mentioned before we are going to run Nutra offers, so what I do first is I ask my rep at LeadBit to give me the top 3 best converting nutra offers.
My rep recommended an offer called VaricoBooster, HondroStrong and Azuvisin. I also got help with targeting, so we are going to target Mexico and Colombia for Azivistin.
Once I have my unique offer links, the next step is spying on competitors.
Spying On Competitors
We are going to spy to see how others are running these offers, what Ads and Landers are using, and most importantly, which are the top performing campaigns in the past 30 days.
To do all this, we are going to use Adplexity Native which is absolutely the number 1 Spy Tool out there.
To find other campaigns running the same offer I’m going to open the offer pages I got from LeadBit, copy the root domain of the offer

Then I log in to Adplexity Native, click on By Advertiser in the top navigation bar, select ’’Search in: all of the above’’ and paste the link into the search box.
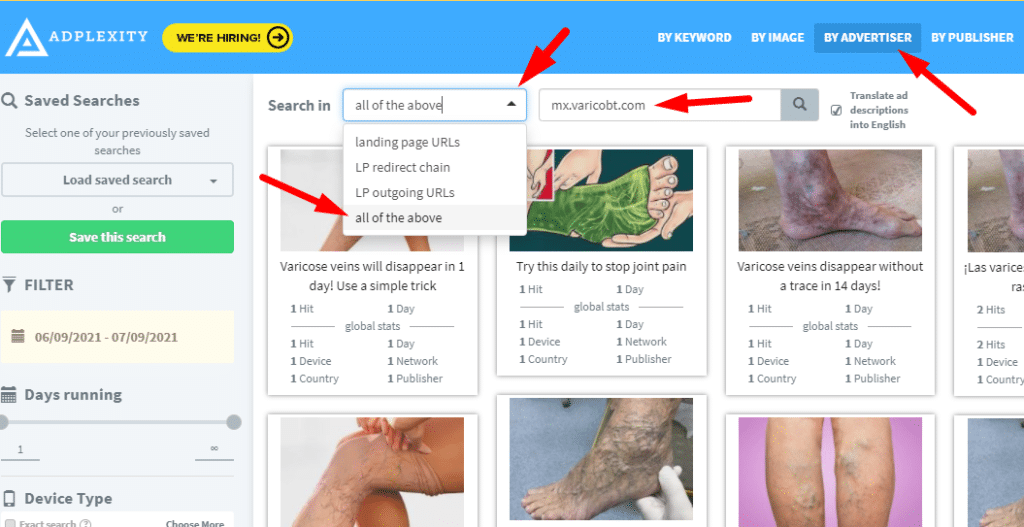
After that Adplexity will show you the most recent campaign running VaricoBooster on Native traffic sources.
But what we need is the top campaigns, not the most recent ones, so first let’s set the date filter to Last 30 Days.

Then sort the ads by receiving the most traffic.

Now we are going to see campaigns that received the most traffic in the past 30 days. The idea is: These campaigns must be profitable, otherwise they would not buy and send that much traffic to these campaigns.
So I’m going to make notes and screenshots of the top 5 or 10 ads I see in Adplexity so later I can create my own ads based on the top ones.
Here are some examples:
ADS:


LANDING PAGES:


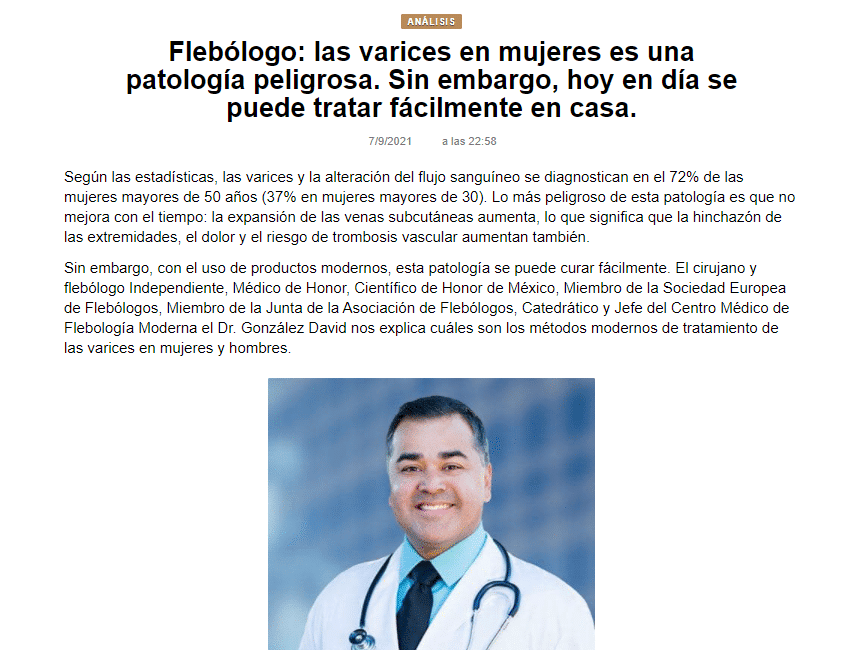
You can find all 3 of these landing pages (and more) inside LeadBit and you can host them on your own server.
Sign Up to LeadBit now and send your manager a promo code “iamattila25” to get extra $25 on your account.
To find them, go to Offers, search for varicobooster (or whatever your offer is)

Then click on create tracking URL

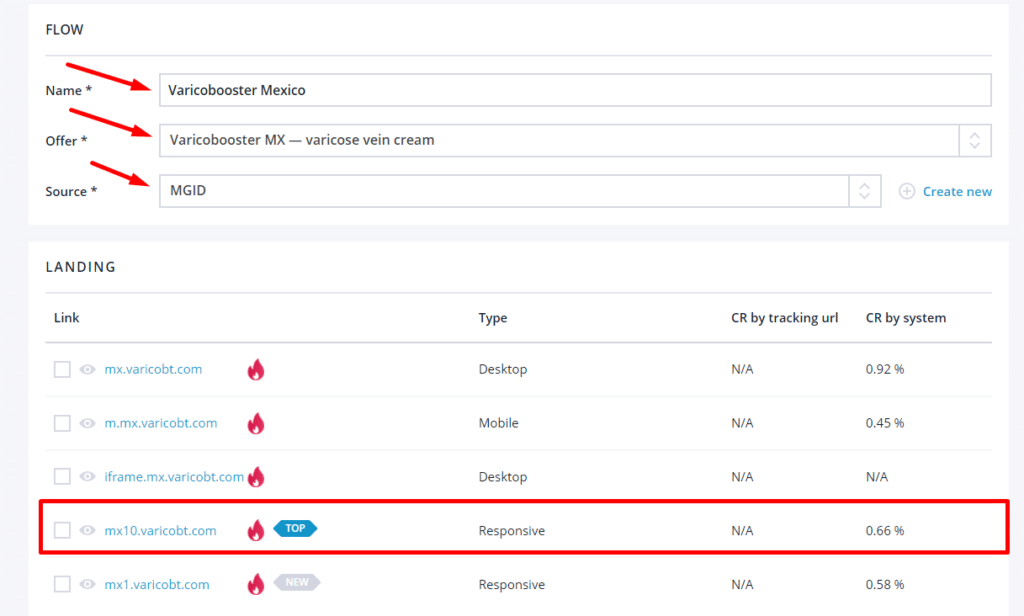
Next you need to name your Flow, select the offer and source, and then you can choose from the available landing pages below.
What I like to do is to copy the landing page content (images, texts etc.) to our own clean landing page template, and change the images and texts here and there to make it unique.
So basically we have a landing page template with our own logos, tracking codes, pixels etc. so all I have to do is to copy and paste the texts, rewrite the headlines here and there, and add the images into our template, upload it on our server and that’s it.
Once we have all this, it’s time to set up tracking.
Setting Up Redtrack for Tracking Campaigns.
The number one tracking system out there right now is definitely Redtrack.
Using a proper tracking system is crucial in Affiliate Marketing. Without proper tracking, you will not receive important data which is necessary for optimizing your campaign for profits.
To set up a tracking campaign you need to follow these 5 simple steps.
#1 Add Your Landing Pages
Click on Landers in the top navigation bar, then +New

Then you need to type in the name and the URL of your landing page

When it’s done, click save and that’s it.
#2 Add the Affiliate Network (Offer Source) You are working with
Click on Offer sources, then +New

Scroll down until you find LeadBit and click on the green add button.

Then you need to add your postback URL and the correct clickID parameter used by Leadbit.

To ensure your setup is correct, ask your LeadBit rep to help you with the postback and clickID.
#3 Add the Offers you are going to promote
Go to Offers and select +New

Then name your offer, select the Offer source (LeadBit) and insert your Offer URL into the URL box.

You need to add the correct ClickID parameter to your offer link. In my case it’s sub1={clickid} so I send the clickid in the sub1 parameter.
My offer URL with the clickID looks like this:

**Always double check or ask your rep on which parameter should you send the clickid.
#4 Adding the Traffic Source
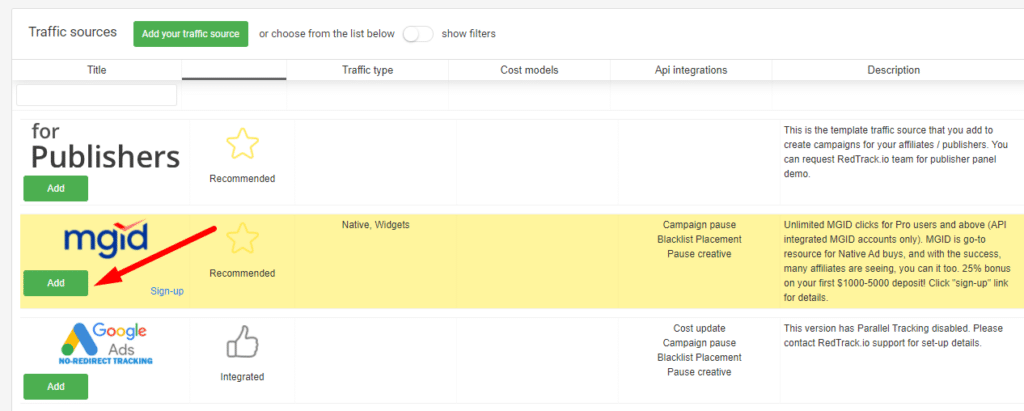
Traffic source is the traffic network where you buy the traffic. Like MGID in our case. So to add MGID as a traffic source, go to traffic sources and click on +New

Next scroll down until you see MGID, and click on the green Add button, that’s it.
If you are done with these 4 steps, you are ready to create your first tracking campaign in Redtrack.
#5 Create Your First Tracking Campaign
Go to Campaigns and click on +New

First you need to name your campaign, and select the traffic source.

Then you can create your flow. You can add multiple Landing pages and Offers if you want to

If you add more Landers or Offers, you can adjust the Weight and Redtrack will rotate and split-test them for you.
Then you need to save your campaign and that’s pretty much it. Next copy your campaign link from the campaigns section:

This is your final URL you are going to promote on MGID.
Creating and Launching Your First Campaign on MGID
Go to your MGID account and click on Add Campaign.

First you need to name your campaign, select campaign category and language.

Next is the targeting setup. In this campaign I’m targeting Mexico and Desktop devices only. After that I’m going to create a separate campaign targeting Mobile devices only.
Always separate Desktop and Mobile campaigns because the bids may differ!
Then I set the daily and overall budget limits for the campaign.

Next is tracking setup.

You can set up conversion sensors to ensure you track every action you need and post it back to MGID to be able to set up auto optimization rules later.
First select Redtrack as a template.

Then copy the Postback URLs (or only the one you need)

and add it to your Redtrack campaign.

I recommend using the (ACTION) postback which is going to track the conversions (sales) you get and post them back to MGID.
Next you need to upload your creatives and create your ads. In the URL box add your redtrack campaign link, the Title is going to be your Ad Text, the image is obviously the ad image and finally select your bid amount (in CENTS).

That’s pretty much it, when you add all your ads, all you need to do is wait for the approval team to check and approve your campaign.
Monitoring Data in Redtrack
When your campaign gets approved and starts getting traffic, you need to make sure that you receive data correctly, so go to Redtrack, select your campaign and click on Reports.

Next click on Subs in the menu bar, and check all subs to ensure that data is coming through the parameters (Placement ID, Campaign ID, Creative ID, etc.)

If all good You should be able to see data coming through like this for example:

It’s very important to check and monitor data right after you get some traffic, because if there is a problem in your setup and you don’t receive data your campaign is wasting money, and later you will not be able to optimize your campaign correctly.
Campaign Optimization
In order to craft profitable campaigns you need to optimize regularly, because no campaign will be instantly profitable, you need to work on it by killing bad placements, creatives etc.
So after our campaign was live for a day or two we are going to start optimizing the placement IDs.
To do this we need to go to our campaign reports and select Placement IDs from the Subs menu.

Next we are going to analyse data, and cut all placements that are spending without bringing any conversions, in other words wasting money. First stop only the ones that are significantly bad and let the others collect more data.
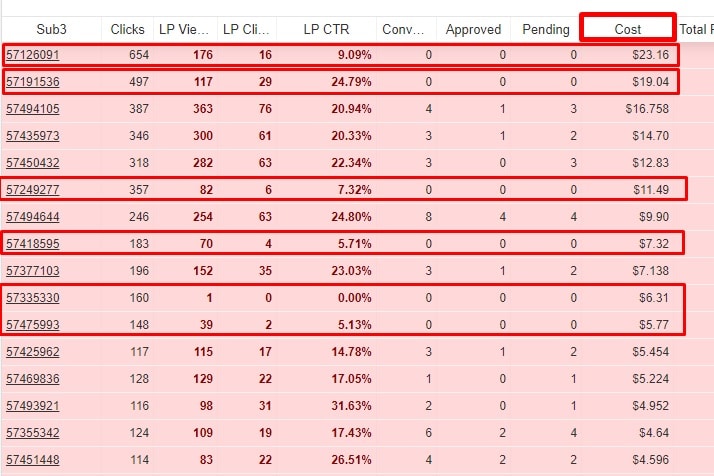
Like in this example above, I stop all placements that are spending my money without bringing any results.
We can also set up auto optimization rules on MGID. For example I set a rule which says: if a Widget (placement) has more than 50 clicks and the conversion count is lower than 1 within the last 7days then block the widget. – This will help us to filter out bad placements right away on auto pilot.
To set up a rule like this, go to your MGID campaign and click on the selective bidding icon.

Then switch Optimization rules ON and add the details you like.

Then we also need to analyse the creatives and if there are bad performing creatives stop them or replace them with new ones and continue testing.
To check the data on your creatives go to campaign reports in Retrack and select Creative ID from the Subs menu.


On the Creatives we don’t have any significant data yet, so I’m just going to keep all of them running to collect more data. Once thing I’m going to do is to increase the bids on the best ones and also on the ones that barely got traffic.
It’s also important to monitor data on Devices types. We launched separate campaigns for Desktop and Mobile, and so far we are doing better with our mobile campaign as you can see on the screenshot bellow.

We need to repeat these steps regularly, especially with Placement IDs. We are going to get traffic from so many placements, we need to filter out the bad ones ASAP!
Scaling Profitable Placements
After a couple days of optimizing, we finally see some profitable placements and creatives. So what we can do now is increase the bids on those to get more (and higher quality) traffic on them.
To do that go to selective bidding, click on edit and increase the bids.

When you have more than one profitable placements you can launch a whitelist campaign targeting only your winning placements.
To do this select all your winning placements on MGID

and click on the Export button above and select CSV.

Then create a new campaign and at the end go to Selective bidding and import your winning placements from the CSV file.


Or if you want to save some time, simply send the CSV file or the Placement IDs to your MGID rep and ask him to add those placements as a whitelist.
Scaling Further
The best way to scale even further is using the so-called horizontal scaling approach. It basically means, launching the same campaign with the same winning Ads, Landers, Offer, on other Native traffic sources.
Spying with Adplexity will help you to see on which other traffic sources affiliates are running your offer.
Other good Native sources I found for these kinds of offers while I was spying are Revcontent, Adskeeper, AdNow.
Conclusion
To wrap things up, to be able to generate big profits by running successful native campaigns, you need to work hard on optimizing your campaigns. It’s very important to be consistent with optimising, cutting the bad performing placements, creatives, device types etc. and let the others run until you have enought data to see a clear picture and find profitable placements that you can use for scaling.
On the other hand, you MUST have a good offer that sells to make profits. Without a good offer it’s not going to work no matter how good your optimising skills are, if you are promoting an offer that isn’t good enough, it’s not going to sell!
That’s why I work with LeadBit especially when it comes to Nutra offers, I don’t have to deal with losing a bunch of money on testing different offers and hoping that one of the offers will sell.. They have the best Nutra offers with the highest payouts and approval rates, so all I have to do is asking them what are their current top offers and I’m ready to go!


