

In this guide I am going to take you through a process to run a campaign. I am not going to give you a winning campaign that you can just cut n paste and profit. There’s no such thing. Instead I will teach you how to run something from scratch, the PROCESS, the SYSTEM, the REAL SECRET to SUCCESS…I’ll also cover how to deal with the problems as they come up and explore opportunities. Ready?
Table of Contents
- How to pick offer(s) to run on a CPA Network
- How to setup your S2S Pixel to communicate with your Cpa Network
- How to spy on your competitors to get some ideas for angles and also to find their profitable landers.
- 1 (One) Weird Trick to Squeeze Extra $$$ Out of Your Traffic
- Getting Your Landing Pages uploaded to Your Website
- How to setup the campaign inside RedTrack
- How to setup the campaign on the Traffic Source
- How to deal with problems that may arise during the campaign process
- How to optimize by killing shit placements, and creatives.
- How to scale vertical and horizontally
- BONUS: Coupons to get you tracker, spy tools, hosting and all the stuff you need for LESS than if you go direct to them.
How to pick offers on a CPA Network
There are thousands of offers on most CPA Networks – how in the world do we decide which offer to run? Some say, ask for the top offers report by revenue. Others swear by looking at the top offers based on conversion %. Many affiliates like to match their traffic source by testing new offers from a network; and affiliates like me prefer to run offers that were tested and proven to convert.
There are two ways to find offers that are proven to work. You can spy using a spy tool like AdPlexity and see what other affiliates are running -or- you can do the lazy, and simplest way and ask your rep which offers are proven, which ones are doing good volume on the network that he recommends.
This is exactly what I did with my rep Fabi @ Gotzha.
He came back and recommended three different geo, all of the offers are sweeps. Two are for iPhone X, and the 3rd is for Samsung Galaxy. In case you don’t know sweeps offers, also called sweepstakes offers are where people can enter to win a prize in exchange for answering a survey. These surveys are so long, that by the time a visitor goes through 80% of the ‘path’ they give up on their effort to get the iPhone or Samsung or whatever. It’s super difficult too, but if they truly do everything asked for they can get the prizes.
Sweeps offers reminds me of this awesome meme from affiliate marketing:
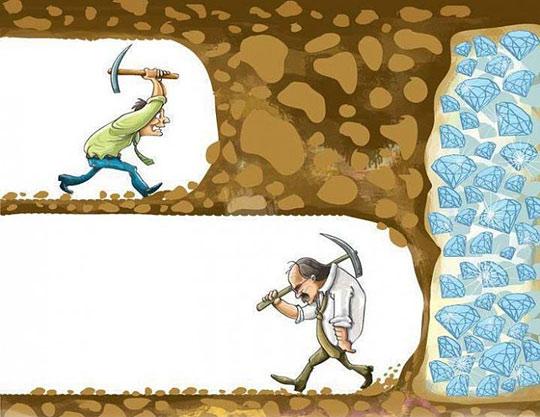
TIPS: Don’t be put off if the offers your rep recommends are NON-ENGLISH geos. You won’t believe how many LAZY AFFILIATES there are that won’t come out of their comfort zone.
NON-ENGLISH geos are the same (only less competition) all you need to do is translate landing pages into the languages the audience understands. I recommend Transey for translation services. It’s 40% cheaper than 1 hour translations, and all translations are made by native speakers.
I DO NOT RECOMMEND USING GOOGLE TRANSLATOR. Have you tried translating something foreign into English and then laughed your ass off? Well there you go why you dont want to use G translate!!!
How to setup your S2S Pixel to communicate with your Cpa Network
Placing Your S2S (Server to Server Pixel) with your CPA Network to make sure you are tracking where your conversions come from!
After consulting my rep at Gotzha on what geos and offers he recommends. He asked me this:

To grab the S2S postback URL all we have to do is click on the TOOLS from the top Menu Inside RedTrack and then select Conversion Tracking.

In case you don’t know a postback URL is the link your CPA Network will place on their CMS system so when you get a conversion, it will fire off the details back (aka the SUB ID) to your RedTrack(er). This is how you will be able to know which placements IDs/zone IDs, mobile OS, OS version, city,state,country, ad,widget, etc converted and really find golden nuggets in your stats.
The S2S link will be near the top under the heading “S2S conversion tracking”, click the copy button to copy it to clipboard and give it to your rep at Gotzha!

How to spy on your competitors to get some ideas for angles and also to find their profitable landers.
Spy Tools are nothing new, but boy have they come a long way since I’ve wrote my Ultimate Spying Guide many years ago. These days they are so awesome, you can find affiliate ads in a matter of seconds and also the good ones.
Some advanced underground affiliates argue that the best ads are hidden and these tools and their owners keep that to themselves, releasing the ads that the spy tool finds with delay, or never.
This conspiracy theory might be true, and to those who like to think it is – you may spy by yourself by creating VMs and setting up different proxies in different geos and browser profiles disguised as mobile phones and what not. Manual spy system is very time consuming to setup and requires a lot of knowledge or money to hire someone to do it for you. This is why paying a couple hundred a month for a spy tool is the best bang for your buck if you factor in time, opportunity cost, and knowledge or the lack of.
To Spy on PUSH & POPS I always love using AdPlexity that was created by the guys at the #1 affiliate marketing forum STM. It really works; and of course it does when the majority of the moderators on the forum are pop and push traffic experts. For Facebook, I prefer to use MagicAdz, the tool FB advertisers recommend to each other.
Since we are going to be running Sweepstakes and we have no clue what landing page or ads to run; we also didn’t yet pick which traffic source to run on – we are going to spy and I’ll show you how below.
The first thing we need to do is open the links our rep at Gotzha gave us, and visit the actual offer page.
Next we want to take this link and plug it into the spy tool search box.
The link I got from my rep was this ->
Next, I fired up my HMA proxy just because many links on CPA Networks have a global redirect that means if you are not from the country, they will take you elsewhere, some even go as drastic as checking user agent. Anyway, with HideMyAss VPN i got a german IP address then I opened the link.
It took me here https://x.1a-gewinner.de/campaign_XXXX.html?coyoteAffiliTokenId=XXXXXX&
We want to take the domain name, so 1a-gewinner.de and paste this into the search box on AdPlexity. To do this, first we login to AP. Then we click BY ADVERTISER, and under the SEARCH IN drop down select all of the above, and then paste the offer page domain in.

As you can see, already different ads and landing pages are coming up. This is not good enough, we want to sort by Received the Most traffic by selecting it from the drop down on the top right:

Now our results are sorted by the landing pages that in theory converted the best as they got the most traffic

These are all landers, and we can download them easily by clicking the check box next to each landing page like this, and then selecting the export selected as a ZIP button below.

AdPlexity made it really easy to rip landing pages. The only problem is that affiliates caught on and they hide so many malicious scripts through javascript, css, encrypted text, and other methods that if you were to just use these landers from addplexity and upload it to your server, you won’t make any money. Chances are the original owner will receive the traffic you paid for for FREE because their scripts will STEAL IT. These btw, are called click jackers or click stealers. I highly recommend using Banners&Landers to get your landers cleaned by a pro coder or what’s even better is have them redo it from total scratch with brand new code exclusive to you.
IMPORTANT: When you ask B&L to re-create your landing page or clean the ones you save from AdPlexity they by default will deliver your order without the right tracker links included. They will put a place holder named “YOUR LINK HERE” or something similar. You can then edit the document yourself, and update that – but what I prefer to do, is when I ask them to get a lander made for me, I send them what link to add. Then I don’t have to waste time adding it after the fact.
Your in-lander link code is by default
https://your_tracking_domain_goes_here.com/click if there is only ONE offer the visitor can claim/buy/convert on.
Your in-lander link code when you have multiple offers on a landing page, like with diet/skin/muscle/ed they have step1, and step 2 – then you’d link it like this
https://your_tracking_domain_goes_here.com/click/1
and
https://your_tracking_domain_goes_here.com/click/2
…very much the same as its done in Voluum and other trackers on the market today.
NOTE: Update to HTTPS if you are using HTTPS tracking link/domain. It always has to match so it doesn’t create problems.
…we are not done yet! We are missing our PUSH notification ad. Sadly no spy tool can pick up push notifications at the time of this writing. So how do you know what works? You can take example from inAPP ads on Adplexity.
On the left menu bar, select Ad Type > In App.

This is what AdPlexity showed me:

I know from running App Installs years ago, the objective is to get them to click, and get a really high CTR. I also know from running pin submits on Google Display Network, where the PLAYBUTTON and the DOWNLOAD button type of banner ads worked best; that on PUSH we need something similar. So using these ideas we will be able to craft some high CTR / click baity push ads.
Quick Recap on what we’ve covered thus far.
We’ve picked our offer after talking to our AM. We placed our S2S Postback URL to make sure conversions will fire back to our RedTrack(er). We’ve spied and found some landers, which by this time are hopefully with Banners&Landers getting recoded from scratch or cleaned up to make sure there’s no malicious code that will steal the traffic we paid for. What I am going to share with you soon is a method that still works, but Google Chrome announced they are soon going to ban it so hurry up while it lasts.
1 (One) Weird Trick to Squeeze Extra $$$ Out of Your Traffic1
This trick has been around forever; maybe you heard about it maybe not – one thing for certain it can help bring in extra revenue and it only takes like a minute to implement. Ready for it?
BACK BUTTON REDIRECT. You can find this script on STM, and I believe they even have an awesome guide on how to implement it. Or you can just ask the guys at Banners&Landers to add it for you. WAIT There’s more. Want to protect your lander so that if someone steals it YOU WILL BENEFIT? IE receive FREE traffic? Then ask B&L about implementing the click stealer script in your LP they are working on for you.
Getting Your Landing Pages uploaded to Your Website
Banners&Landers just sent me back the landing pages I asked them to re-code for me from scratch that I found while spying above.
I selected TWO landing pages, and will be starting in Germany. So the landing pages themselves are also in German. (If you found English landers you really like you can get ’em translated by Transey for 40% cheaper than OneHourTranslations – all done by native speakers in the target geo. None of that google translate crap)
In case you are new, and you don’t have a website yet, a domain and a web host you can upload the landers to. You can get a shared web host or a dedicated account it’s up to you. Shared hosts are cheaper, but if another person’s website gets overloaded it can bring down the entire server. My server for iAmAttila, our lead gen websites and agency site is hosted in the USA but since I am running in EU geos for this, I will get a VPS from Digital Ocean in Europe so that load times will be super fast (one trick to success is fast lander loading speed, remember that).
For domains I recommend you check out NameCheap
To upload the landers, I use FileZilla, and login to my server, then simply drag and drop the landing pages from my PC on the left to the D.O. server on the right and that’s it. Super simple.

After the landers are up, I visit my website and test the path www.mywebsite.com/de/lp1/ and www.mywebsite.com/de/lp2/ to make sure it all works fine and loads fast.
Now that we have all the materials, we need to setup the tracker…
How to setup the campaign inside RedTrack
I am going to create a new campaign in RedTrack, add the two landing pages, offer links from CPA network. Follow along.
First, we will goto redtrack and login. (If you haven’t yet signed up you can do it here)

Next, we need to add our TRAFFIC SOURCE, and WE ALSO HAVE TO ADD OUR CPA NETWORK!
First we click on TRAFFIC SOURCES on top Menu, and then select create NEW

One of the awesome things about RedTrack is they have most traffic souces, and all of their dynamic tracking tokens already available in the system, so you don’t have to manually search and find the tokens then one by one add them. We select our traffic source from the list and press ADD

When we press ADD, it will take us to the New Custom Traffic Source page where we will have the chance to edit the tokens and add our own and check to make sure things look fine. It looks great so all we have to do is click on SAVE

We now added our Traffic Source, next we still have to add our CPA Network GOTZHA!
To do this, we are going to return to our trusty top main menu. Click on NETWORKs, and then select NEW.

They make it super easy to add CPA Networks just like traffic sources, so again we look for our network Gotzha and click ADD

They will show us a confirmation screen where we can check the data, make sure it looks and/or edit it if we chose. But it’s ok AS IS so just press SAVE

OK Now that we have traffic source added and the cpa network too we can go on and create our tracking campaign for our sweepstakes campaign! Some lucky person will have the chance to win an iPhone!! YAY!!
On The Dashboard after we logged in, click on CAMPAIGNS

On the campaigns screen, click on NEW

New Campaign Settings part #1 – We type in the campaign name, we select our traffic source from the drop down menu, we select our preferred tracking domain. We select HTTP 302 redirect with hidden referral, protocol stays HTTPS. For the cost of campaign, I like to select Do Not Track since in most cases it’s random and changes all the time.

>>> CLICK IMAGE FOR FULL SIZE VIEW <<<
New Campaign Settings part #2 – in this part, we are going to add the landing pages we uploaded via FTP and also the offers we received from our rep.
We are testing two separate offers, one is to win an iphone X phone the other is a mediamarkt gift certificate. So what we need to do is split test 2 streams (paths) basically, as we have one unique lander for each and attach the offer to match.
What this will do is when a visitor comes, they will be taken to the ‘stream’ where we’re giving away the iphone, or the path where we’re giving away the 750 euro gift certificate.
We can’t just add the offers under offers and the landers under landers in RedHat because what could happen is if a visitor arrived to win an iphone, they’d click the call to action and arrive at the screen to claim the gift certificate so there’d be huge user dropoff. To avoid this, we setup two separate streams and attach the right offer to the right lander.
Here we go… on the NEW CAMPAIGN screen, on the right part click ADD – to add another stream so we have TWO total.

We should now have TWO STREAMS:

Next, we will work on Stream #1 followed by Stream #2. Click NEW LANDER – it will open a new page, there you will need to put the lander name and address then press SAVE.

>>> CLICK IMAGE FOR FULL SIZE VIEW <<<
We know LP one is for iPhone so we need to put the matching offer from Gotzha by putting in the link our rep gave us. Click NEW OFFER After that type or cut n paste the offer name, select the affiliate network, type in the payout you are receiving, the URL of the offer, make sure you append &s2={clickid}, select the country and click SAVE.

>>> CLICK IMAGE FOR FULL SIZE VIEW <<<

>>> CLICK IMAGE FOR FULL SIZE VIEW <<<
After you are done, do the same steps but this time for the other offer your rep gave you. Then press SAVE on the new campaign screen, and you are done. You should be taken back to the main dashboard. We just want to grab our link now, and we’re ready to setup our ads on the traffic source!
To grab your campaign link, click that little chain icon net to the campaign name on the dashboard. It will automatically copy the link to the clipboard for you.

How to setup the campaign on the Traffic Source
Now we are going to setup our PUSH campaigns. I decided to start on a PUSH network that has been sending a lot of emails about their push traffic lately.
I looked at the Traffic Chart, and their average cpc for one push notification is 6 cents and 0.54$ CPM. My strategy was always to start off with CPC, then switch to CPM when I find killer ads that get high CTR! So here we go!
Click Campaigns, name your campaign, under native ads decheck everything except PUSH notifications. Choose the pricing model CPC. Remember how we copied the link from RedTrack earlier by clicking on the little chain icon? This is where that campaign link needs to be pasted into, the “enter target URL” field.
CLICK NEXT STEP after you filled it out the way I did.

Set your country, so for me it’s Germany, then select platform, I will go with Desktop and Mobile (although it’s always a good idea to split it up, but now I just want to show you how to setup a campaign quick) Make sure that frequency cap is set to 1/24. Anything beyond is just wasting your money and annoying the user. Click Next Step when you are done.
*I left most of the other parts empty for now, because I don’t know what zones to block, which ones to target. That will happen when we get some data. TIP: Some cool reps from Traffic Sources can give you best zones to target or zones to block from the start, but since I didn’t have anyone helpful on this source.. I’m a lone wolf on this one.

>>> CLICK IMAGE FOR FULL SIZE VIEW <<<
On the next screen is where they tell us how many impressions they have and a recommended CPC bid. I set the maximum, because why not, and my daily budget is $25, and lifetime budget is $100 to test these 2 landers properly and 2 offers in germany. I usually calculate like this. If the offer pays $2.90, we want to spend 4x per offer per creative.
So if we have 2 offers, 2 landers, thats 4 “variables” therefore, we want to do 16x$2.9 == ~$40
Let’s add a total of 4 ad creatives aka PUSH notification ads. Then our math will be 4 (ads)+2(landers)+2(offers) = 8 variables *4 * $2.9 = ~$80. We’re allocating a total of $100 for this combination with 4 creatives to test if it will make us money or not.
**These are ROUGH figures!!!
How much traffic to expect? The tool says there are 78,000 impressions available. We won’t get 100% of these impressions but for the sake of this guide lets assume we will. If we get 1% CTR on our PUSH notifications, that means that 1% of 78,000 will turn into a click – or 780 people will arrive at our lander. NOT A LOT AT ALL FOR SCALE. But we’re learning how to set shit up right now and might have to test another traffic source for Germany or simply see what geo has a lot of impressions and ask for offers for that geo.

I’ve created the ad, and uploaded the campaign. Now we are going to wait and see what happens. My ad is pretty aggressive, I like to start there to ‘push the envelope’ and see what is the ‘farthest’ I can go in terms of my ad that I know will get the best CTR.
I used to run huge volume with APP Installs (CPI) many years ago. One of the biggest angles that made me a fortune was You have a virus! This angle was a free for all on google display network before they outright banned it with a new policy update on March 31st I think in the year 2013? And after that, App Installs and their popularity among affiliate marketers started going down.

While we wait for moderation, which could be a couple of minutes, or couple of hours, or even days… let’s recap what we’ve done to date.
First of all congrats for sticking around this long, running a campaign from scratch is not this time consuming when you do it everyday. Now that I am taking screenshots and writing copy explaining everything like they do in those Books for Dummies .. i realize damn, this a lot of knowledge we just pow through with when we get these camps up.
There’s SO much shit to prepare, so much organization, so much back and forth you really need to be super organized and have help else you will go crazy!! Up until now we learned how pick an offer, how to spy and find the landers to use, how to upload our cleaned landers to our server, how to setup a campaign in RedTrack, and how to setup a campaign on our traffic source… Next up, we are going to deal with rejection, this happens a lot in affiliate marketing – ads getting rejected. We will also look at our funnel to make sure things are working, and fix any mistakes that might have happened. We are human after all. 😀
Couple hours later, I got the email of doom….

It was expected because I straight up launched with the most aggressive angle ever – YOU HAVE A VIRUS!
How to deal with problems that may arise during the campaign process

I toned it down a lil, and launched some new ads..
Unlike Adwords/Facebook, each campaign can have just 1 ad in it for PUSH. So You need to make different campaigns for different ads.
After doing so I went to sleep, and this morning I woke up to THIS:
Now I went over to my tracker and saw this:

>>> CLICK IMAGE FOR FULL SIZE VIEW <<<
The traffic source stats show we had 1245 clicks, tracker shows we received 1226 clicks. That means 19 are missing? I can live with that, that’s pretty awesome.
Remember how I signed up to DigitalOcean to setup a VPS in Germany? It was to make sure that my landers load super fast. Imagine if I would’ve hosted them on my dedicated server in the USA, my click loss would’ve been way way more than 19 clicks! Server speed, tracker redirect speed matters a LOT.
We are going to dig in and look at our RedTrack stats to see which angle converted best, which creative, etc. Identify what mistakes we’ve made.
The first problem I see is that the conversions we’ve received at Gotzha don’t show up in RedTrack. This is a major issue as we can’t tell which ad, which zone, which lander did best.
Our postback pixel isn’t working, we will need to fix that to make sure it works, and also manually upload the conversions.
Go into Gotzha and click on Reports on the left menu, then Conversions

>>> CLICK IMAGE FOR FULL SIZE VIEW <<<
Then Look for the field SUB ID 2

YES, the tracker passed the clickID’s along so we can upload the conversions. If this field is empty and there’s no subids in any of the columns that means you messed up when you added the offer and you didn’t append &s2={clickid} to the link that your rep gave you!
What we need to do EXPORT this by clicking on the export button. Open the spreadsheet, and you will need to edit it a bit to make it look like this, then save it as a CSV file.
Next, we will manually upload these conversions into our RedTrack.
Head into your Redtrack account, and click on LOGS > CONVERSIONS > UPLOAD
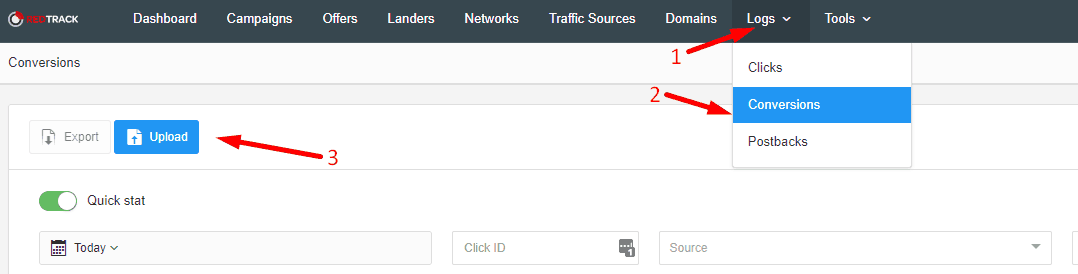
Look for the file you saved with the subid2’s and upload it.
HINT: If you run into trouble at any time, the awesome support team at RedTrack is available via livechat for you.
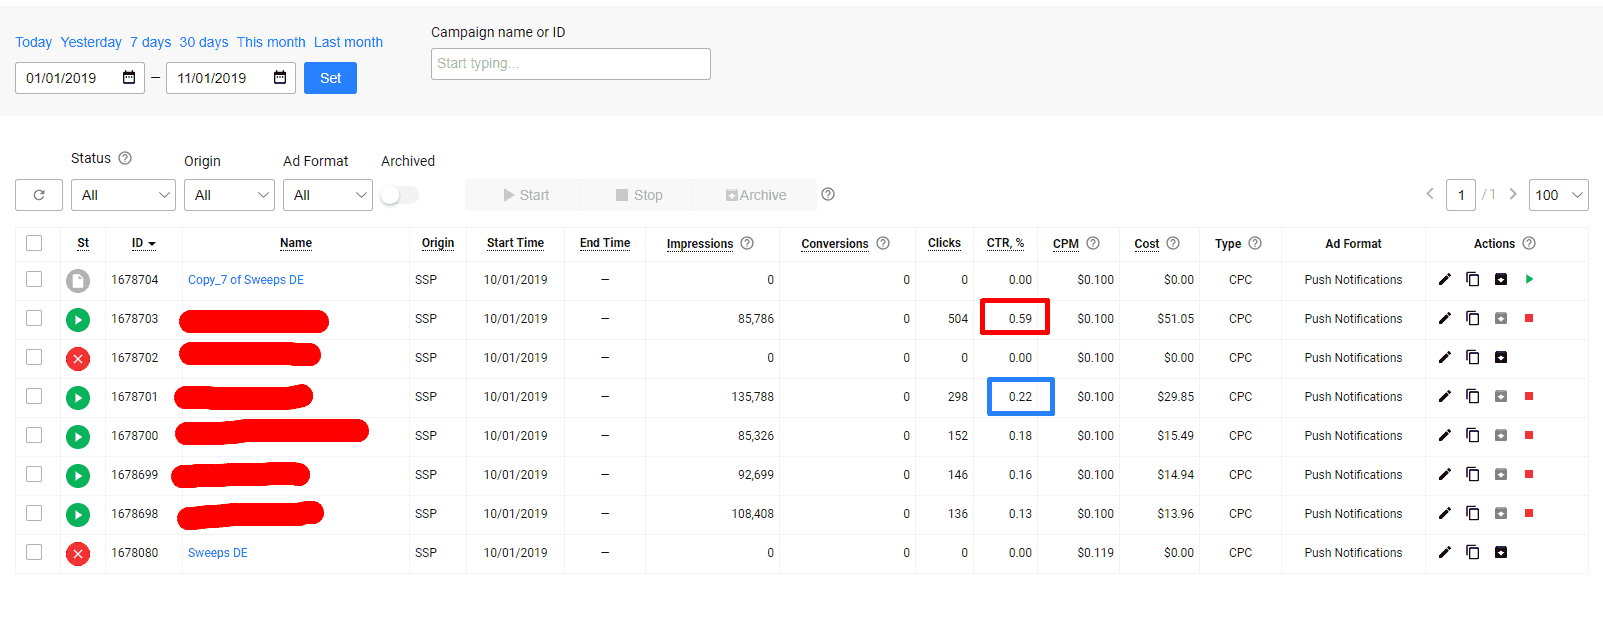
That’s it, now when we go back to our main screen it should look like this:

How to optimize by killing shit placements, and creatives.

>>> CLICK IMAGE FOR FULL SIZE VIEW <<<
Sweeps Lander #2 (750 gift cert) did better

We wanna look at the ZONES. By clicking Subs > Zone ID > sorting by most clicks. We were paying-around 11 cents per click, so we’ve gotten 202 clicks at 11 cents thats around $22 and made 3 conversions at 2.9 euro each. So we’re about -50-60% ROI here.
The second zone with most traffic 2152268 sent us 114 clicks, and 0 conversions, we’ve paid around $12-13 for this placement, and got 0 sales so since we use the offer payout x4 strategy that means this placement can be excluded moving forward. The rest we leave.
2152268 spent 4x our offer payout, so and got us zero conversions so we block it.
Next we check which campaign (remember we have 1 ad per campaign) so we’re checking which one had the highest ammount of conversions to know which ad did best.

>>> CLICK IMAGE FOR FULL SIZE VIEW <<<
Moving forward – Changes We Are Doing & Optimization Strategy
Changes/Fixes We Are Doing
-Fix S2S postback issue between Gotzha and RedTrack so we don’t need to manually upload conversions before
-Fix the prize on the landing page (right now there was fall off, because I used a Samsung Galaxy 9 lander and sent them to an iPhone offer)
Based on the data
-Blacklist the placement that spent offer payout x4
-Kill all the creatives except the one with highest CTR, and launch 2-3 variants of that creative.
-Run traffic to our gift certificate offer as it does better, and pause the other one.
I loaded $200 more into the traffic source and let it run..
24 and a few hours later…
This is what I got, DISASTER – result is worse despite us doing some minor optimization:

>>> CLICK IMAGE FOR FULL SIZE VIEW <<<
Were you expecting $1000 profit? 😀 If yes, then you watched too many fake guru videos I’m afraid. You see affiliate marketing will be 90% failure, and 10% success. This is why they say you have to test, test test, use a tracker, look at data and find ‘pockets of profit’ or ‘avenues of opportunity’.
Looking a step deeper in my stats, I noticed something jump out:

What we are going to do next… if this doesn’t help us get into profit, then we are going to STOP here and test another geo/offer that our rep recommends!
-We are going to load $100 more into the traffic source.
-We are going to pause every other campaign.
-We are going to only run campaign 1678701.
-We are not going to change the bid or anything.
-We will order variations of our best performing landing page (update the pictures/testimonials to reflect localized names, test new images of our giveaway.)
BONUS: I will also take my best angles, and my best landing page/offer combination (aka FUNNEL) and try my luck on MEGAPUSH as well. They always say test,test, test but they never explain to you what it means the way I do 😉

24 hours and some time later (OPTIMIZATION IS WORKING!!)

>>> CLICK IMAGE FOR FULL SIZE VIEW <<<
The split testing worked and our EPC jumped from $0.053 to $0.686! Sadly it’s still not good enough. Why? Because most of the zones are not converting.
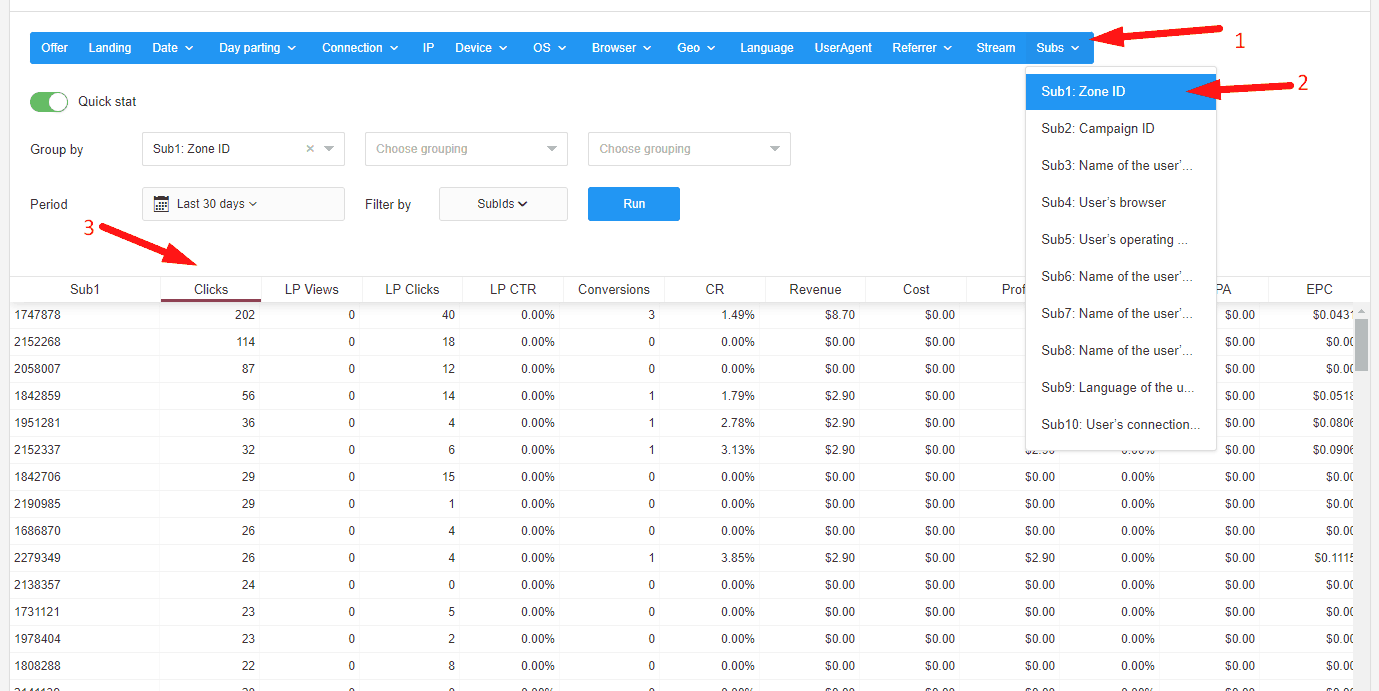
Check out what happens when we look at the stats for our Sweeps campaign, and break it down by Zone IDs in redtrack.

>>> CLICK IMAGE FOR FULL SIZE VIEW <<<
We could dive into the ZONES and block aggressively and try and squeeze out some profit here, but we’d have to block over 30 zones that sucked away more than offer payout x4 and didnt bring a conversion.
There’s an 80/20 rule in affiliate marketing, if 80% of placements aren’t showing promise, then it’s not the best fit because by the time you kill all the bad placements you will have very few left for scale.
Wondering what happened with my campaign at MEGAPUSH?
Well, porting my highest EPC funnel and the new variants over to megapush paid off. Our Landing Page #2 with img 2 & 3 did the best. Got us EPC above 7 cents.

We bid 6 cents per click, and we’ve broke even now. The next step is to cut the worst performing landers, and look into the zones on MegaPush and block everything that spent offer payout x4 and didn’t convert. This will help get us into positive ROI territory.
How to optimize your MEGAPUSH campaign by killing shit placements, and creatives.
Sadly The 1st traffic source we started on didn’t make us profitable; it doesn’t mean that the traffic source sucks – it just isn’t the best fit for this geo/vertical combination. That is why you always hear people say you need to test different traffic sources. And that is what we did, I setup on MegaPush and straight out of the gate it was almost in profit.
I decided to rather than writing this guide to reflect the ‘perfect world’ scenario like everyone else always likes to do when they show these case studies, I am showing you how it truly is when you run a campaign – that you will fail and not be able to buy a lambo right away.
Moving on we are going to dive in, and optimize by killing the under performing placements and leaving only the best creatives.
Back to our trust RedTrack, we look at the MegaPush Sweeps in DE campaign.


GOAL is for our EPC (Earnings Per Click) to exceed our CPC (Cost Per Click) that’s $0.06 by killing the shitty under performing elements of our campaign.
A DAY LATER
Finally, we’re in Positive ROI and making Profit. This was a stressful ride right? Affiliate marketing is HARD. But, perseverance pays off.
So we’ve received 1680 clicks to our tracker, so our cost was 1680 clicks times 0.06$ (6 cents) so $100.8 for traffic on MegaPush. We generated $139.2 in revenue (actually more, because the tracker is saying we get paid 2.9$ per lead, but its actually in euros so its a lil bit more due to the exchange rate) Anyway, lets just say we got $2.9/lead. That means we made a profit of $139.2-$100.8 == $38.4 or an ROI of around ~38%

How to scale vertical and horizontally
When you optimized your funnel the way I have, now to increase your profits the best thing to do is to scale things horizontally and vertically.
Horizontal scaling means to take your winning funnel and translate the ads, and landing pages to different languages. Start out by asking your Gotzha rep, what other geos do they have the offer available in, then make a list of these geos and what languages they speak.
Next extract the text from your landing page into a spreadsheet. I highly recommend creating COLUMN A and labelling it as ENGLISH and writing the text to be translated in there. Then Column B,C,D,E,F.. etc should be each reserved for a different language. This is the easiest and most efficient way to get translations done for the cheap. Use Transey.com for the lowest rates on translations done by native speakers!
Vertical scaling means taking what works on your traffic source (MEGAPUSH) and porting it over to other push sources.
Vertical scaling is super easy as you have all landers, images and angles already ready. You just add the new traffic source to RedTrack, and then duplicate your original campaign and update the TrafficSource name and also the postBACK url to the traffic source. And in a manner of minutes you can be up and running without having to prepare things from scratch and wait for landers, and image ads to be designed again.
And there you have it, we come to the end of this awesome and super detailed How To Guide. Hope you liked it, I grew a few hairs because PUSH traffic is crazy. It’s not consistent, when you set budgets they like to exceed them by as much as 200% if you are the top bidder (you can control it by bidding minimum then it doesn’t ramp up and spend like crazy). The interfaces on most of the push networks are wonky so if you are used to Facebook & Google Ads like I am, then you will experience extra stress here and there.
BONUS: Coupons to get you tracker, spy tools, hosting and all the stuff you need for LESS than if you go direct to them.
Tracker – REDTRACK – 50% OFF Coupon: IAMATTILA50OFF [claim here]
CPA Network – Gotzha – contact me to introduce you direct !!
Spy Tool – AdPlexity – 30% LIFETIME Discount Coupon [see here]
Traffic Source – MEGAPUSH [sign up here]
Hosting Account – DigitalOcean Discount Coupon – [see here]
Need Help? – StackThatMoney Forum – Risk Free Trial for a Month! [join here]
Need Landers? – Banners&Landers – [Order here]
Need Translations? – Transey – [Order here]
FREE GIVEAWAY! $50 AD VOUCHER to MEGAPUSH1. Create an account to MEGAPUSH HERE 2. Send me an email with the subject: $50 FREE VOUCHER MEGAPUSH CONTEST. VERY IMPORTANT!! In the email body, leave your Facebook Profile link! 3. WAIT – The lucky winners will be tagged on Facebook when I announce the winners!! |
|---|


4 thoughts on “The most epic $1 guide to making money with sweeps on PUSH traffic! [now FREE!]”
This is fucking awesome! epic! thanks for this brother!
Thanks 🙂 is it better to use a landingpage or can I direct link?
direct linking has lower conversion ratio 99% of the time
Awesome guide Attila! But I did not get why did you use “You have a Virus” for a sweeps offers?
Also, how to scale push campaigns? One day my push camp does very well, next day it is like dead. I am making almost 1 new camp every day. But not able to scale any camp to a decent extend.